Download the Word Doc and Maps ZIP
NOTE: The Main Map (above) can be printed out at 24” by 40” to create a poster-sized battle grid with 1” squares; but, each of the Encounter Areas (below) can be printed out much easier at 8” by 10” (therefore fitting nicely on standard 8½” x 11” paper) and will still have 1” squares (each representing 5 feet; perfect for miniature combat). In addition to the dozen Encounter Area Maps below, a Player hand-out “Canvas-style” version of the above map can be handed out if your Campaign calls for it.
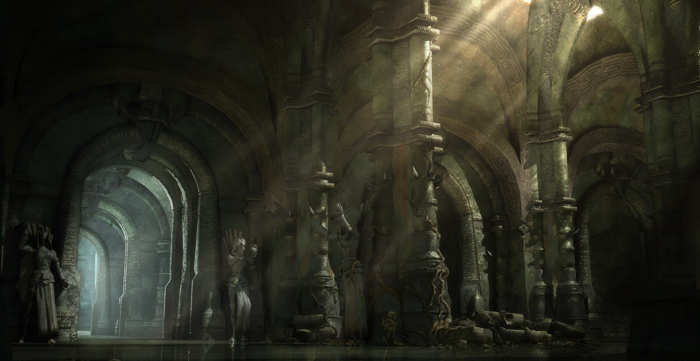
The concept of this map is a marble dungeon used as a lair. It was probably abandoned by whatever ancient architects built it; its current residents found it and moved in. But of course, it doesn’t have to be used that way. All areas on this map have the same blue marble floors and brown marble walls, except as noted otherwise. Doors and locks should be appropriate to the level of the dungeon.
#1. The Entry Hall. A large bas relief depicting an eye sits near the middle of the floor, slightly off-center. This is a fine area for an encounter, though the eye could also be a magical sentry alerting the denizens ahead (the eye’s Passive Perception should be appropriate to the level of the dungeon, as per page 42 of the DMG; as should the DC of recognizing it for what it is).
#2. A large rickety bridge spanning a deep gorge (the fall should be far enough to deal appropriate damage based on the party’s level, as per page 42 of the dmg). If the denizens of the dungeon are aware of the PCs’ presence, than archer or other enemies with ranged attacks appear in the balconies on the sides to take pot shots at the PCs. To make this encounter even tougher, here are a few suggestions: the bridge could be unstable, required Balance checks to stay on; an elite melee-based enemy could approach from the far end of the bridge; or the ranged enemies on the side could have powers that force movement, thus allowing them to push the PCs off the sides of the bridge from range.
#3. Barracks, with eight hay-bale beds and eight chests. A card game seems to be in progress. The two bedrooms have similar beds; one also contains a barrel, a couple boxes, and several canvas sacks (the contents, if any, are up to the DM). This is an excellent areas for an encounter with several monster roles (especially if the PCs didn’t somehow kill them from the bridge).
#4. Blood stains the floor of the torture chamber, which contains a rack, and several wooden maidens (two are standing up, one is laying down). The torturer fearlessly keeps a bed in the corner, and a desk (for posterity). Two of the five cells contain corpses; the others may or may not contain potential allies. At the back of the fourth cell are two loose bricks; removing them reveals the unfinished tunnel of some past escape attempt … but what happened to the dirt? Perhaps the torturers notes provide some gruesome explanation.
#5. Depot and Mess Hall. The largest room in this area contains two tables (either with dinner served, or dirty dishes) as well as a keg of drink and lots of supplies (in boxes, sacks, and barrels). One of the smaller rooms contains four hale bales (either as feed, or as extra beds). The other contains four armoires and various sized boxes (probably full of mundane arms and armor). The complex layout combined with the crowded furnishings would make an encounter here very interesting.
#6. This large area is ideal for an Encounter with faster or larger adversaries (perhaps trained guard beasts). The stairs might lead down to some other level, or perhaps another dungeon. Alternately, the terrifying guard creatures can be found already dead, testimony to the fact that the PCs should avoid the stairs.
#7. Just a four-way hall.
#8. A library. The marble floors here are green. Several book shelves are set in the walls, and several more clutter the room (the map depicts extra books on top of each, held standing by book ends on either end). Two desks and small benches are present for reading and writing. A magic circle of some sort sits in the center of the room. An encounter here would offer several obstacles, at least until someone decided to turn the obstacles into fiery hazards.
#9. DON’T SHOW THE PCs THIS AREA MAP UNLESS THEY HAVE ALREADY UNCOVERED ITS SECRETS! The door in the center of the area leads nowhere, and is trapped. There ARE also four spots where the walls seem to be of newer construction (the marble is a slightly different color). Three of these spots are actually trapped, so that anyone breaking down the new constructions sets off the trap! The fourth hides a secret treasure vault (setting off one or more of the traps should dissuade anyone from checking the rest and finding the treasure; finding the treasure should persuade anyone to go and set off a trap while looking for more).
#10. Barracks, with eight hay-bale beds and eight chests. A card game seems to be in progress. The two bedrooms have similar beds (one has two beds) as well as a lot more boxes, barrels, and chests. One has a bear-skinned rug (this is probably the boss’s room). Otherwise, this room is very similar to Area #3, and the ranged-attackers to the left of the bridge probably ran there from here.
#11. The Hearth. A large kiln or oven fills the middle of the room. The top half of the room is used as a kitchen, and contains a table and several boxes, sacks, and barrels full of supplies. The bottom half is used as a forge, and contains an anvil, a hammer, a couple armoires, and several crates and boxes full of arms and armor. An encounter here probably includes a strong archetypal blacksmith, and perhaps a martial artist, knife wielding, chef who is a former adventurer.
#12. The Chapel. On the left and on the right, four archways separate the nave from the side aisles. Short stair cases lead up to a raised dais constructed of a different colored marble. The cover of the arches and isles, as well as the height of the dais, would make an encounter here more interesting.